
This post continues a series on the way Portal introduces and intermingles its core mechanics to engage and instruct the player from start to finish. If you missed them, read the first, second, third, and fourth parts before continuing.
Last time, we covered everything through Test Chamber 15, seeing some of the more complex puzzles available after we acquired the upgraded Portal Gun. As we’ll see shortly, the challenge and intricacy of each test continues to escalate. The chambers we’ll discuss today continue to teach the player, and some even introduce completely new elements, but they also serve as a sort of exam for everything they’ve learned before.
The new elements begin with the first chamber of the day, Test Chamber 16.

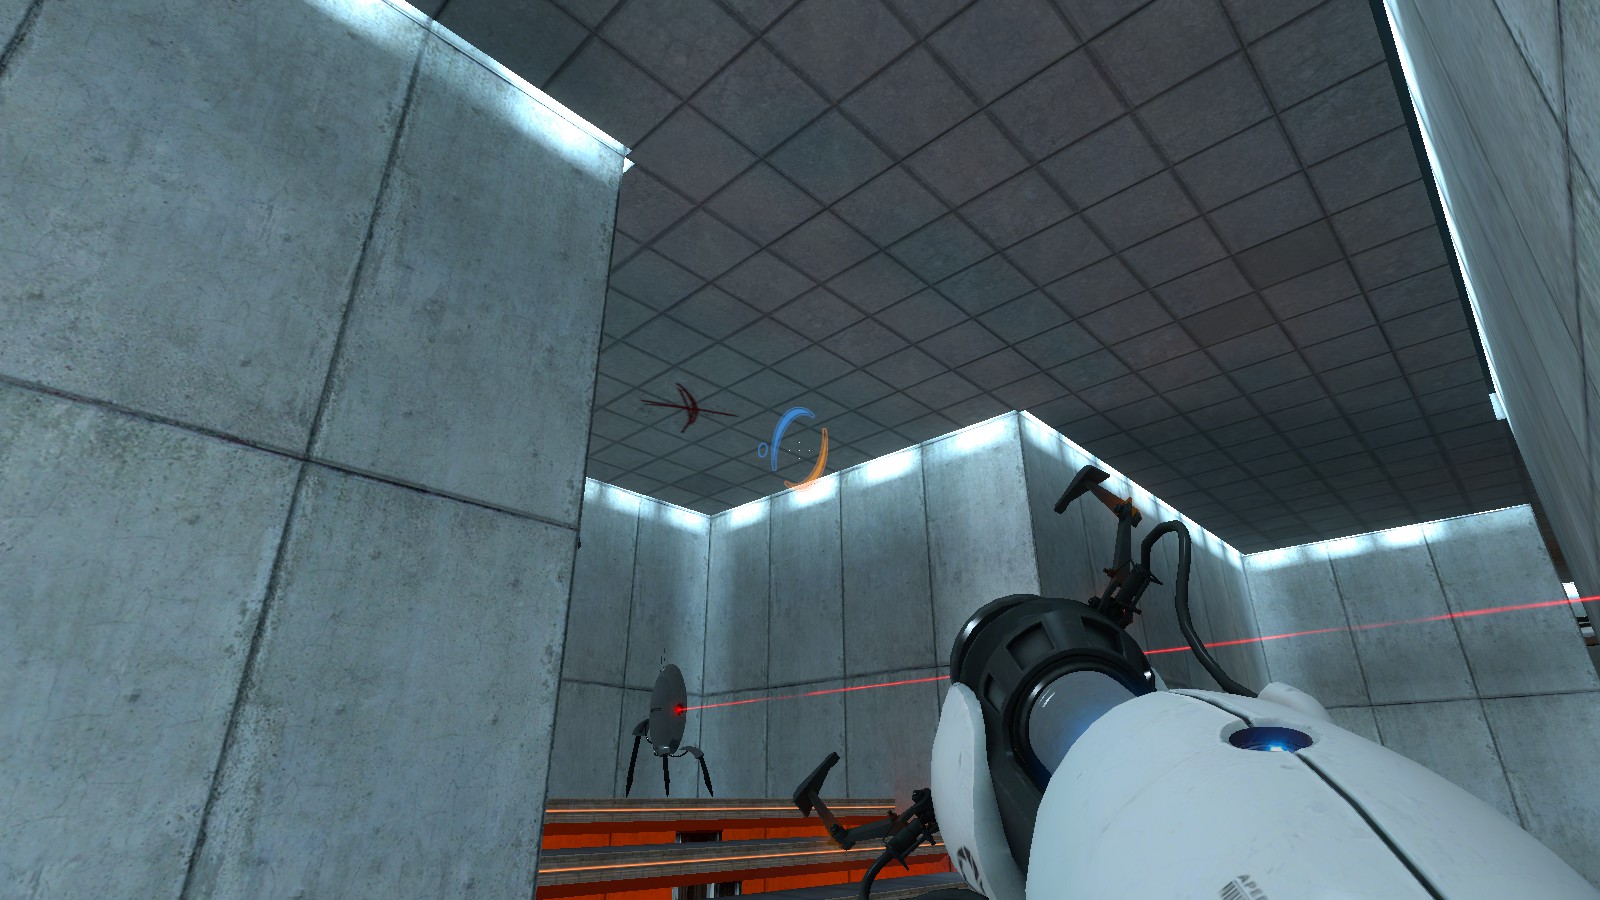
Starting in a dim, enclosed hallway, the narration informs the player that the intended test for this point is under maintenance, and it has been replaced with a live-fire course for military androids. So enters an entirely new class of obstacle: turrets, the closest Portal has to the enemies seen in other games. Despite the evident danger associated with a robot designed exactly to shoot them down, it is nigh-impossible to be injured by the first turrets the player encounters.
After the dark hallway’s door opens, there are two visible turrets of note. The first is physically in the room with the player but facing down the next hallway, and as turrets are unable to move on their own, it offers the player a chance to safely deal with it in whatever way they first think. The second, likely more jarring turret is facing directly at the player and will almost immediately open fire, but its bullets will simply leave marks on the pane of glass between them.

This encourages the player to recognize the danger they present, but also that while they can see through glass, they cannot shoot through it. The combination of loud noises and the visual of an unfamiliar object quickly condition the player to recognize the danger these new foes present without ever actually being in harm’s way.
Of course, an entire puzzle based around turrets couldn’t remain safe forever, and as soon as they incapacitate the first turret, they round a corner to be greeted by a thin, red laser sight projected from the hallway ahead—past another corner, to forewarn rather than present an unknowable threat.

Astute players will recognize the sight from their first two turret encounters and know that they must find a way around the threat that lies ahead. Meanwhile, floor icons coupled with the delay between sight and shot give curious players a chance to identify it without sustaining heavy injury.
Proceeding past it leads to another sight looking out from a ledge in the next hall, and on approach the player may notice a red “X” mark on the ceiling above. This presents yet another option for dealing with the turrets: dropping from above, where they are completely blind and vulnerable.
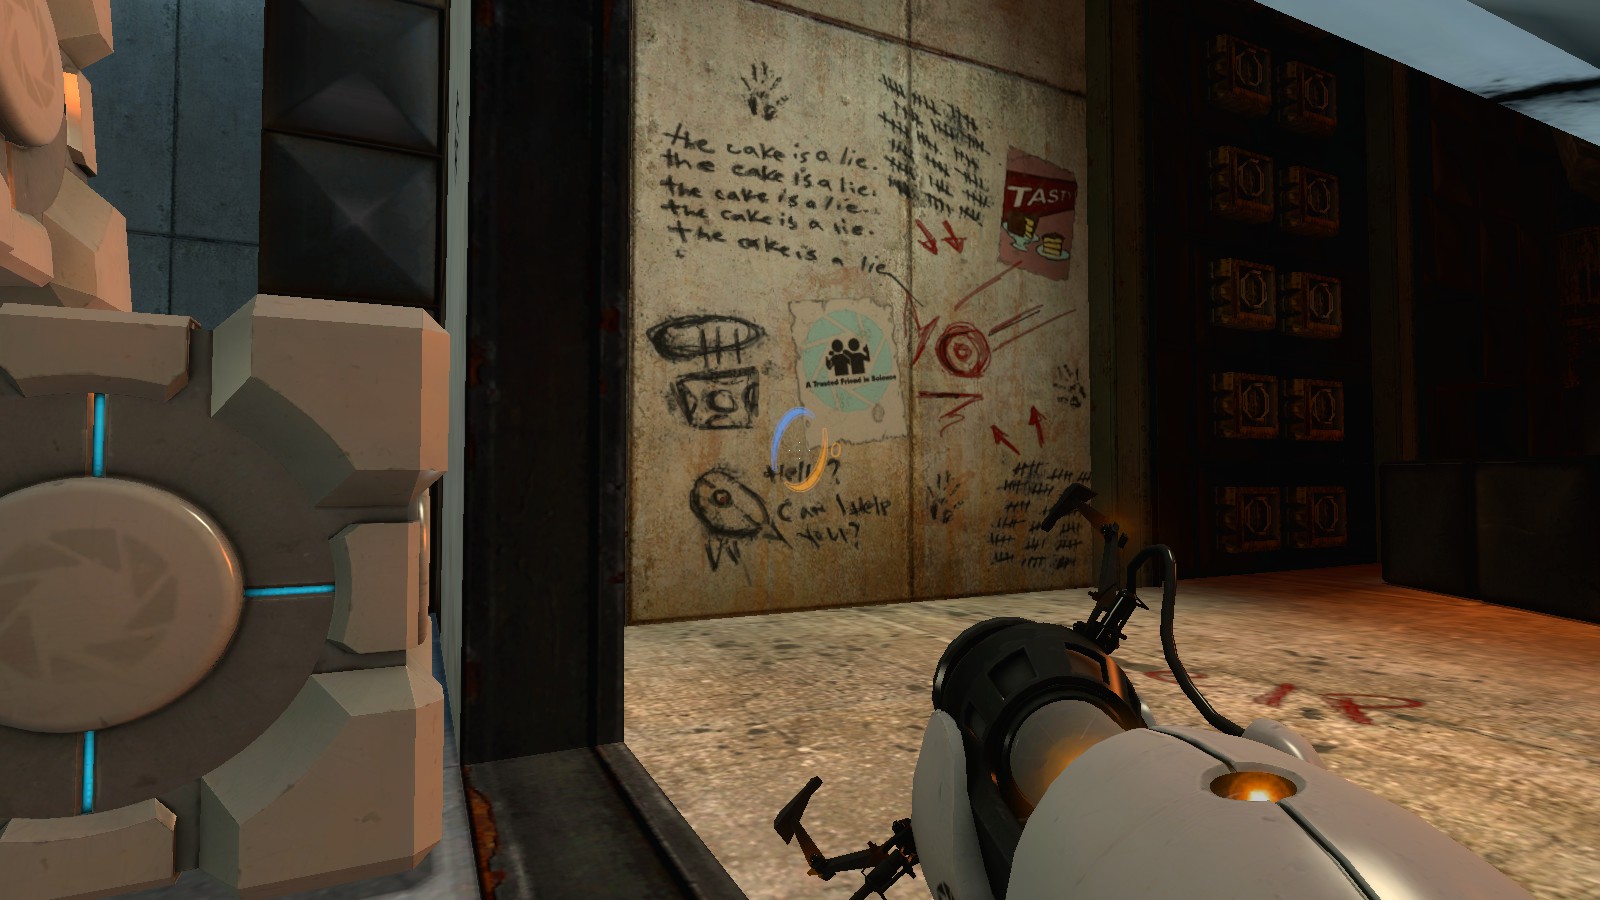
The next segment is an odd case, as a stack of two cubes are wedged between the wall and a protruding panel, allowing the player to crawl past and see what lies behind the facility’s sterile interior. This den offers a few significant points both narratively and mechanically: First, it is much darker and grimier, a stark contrast to the appearance of everything prior. Its presence in the first violent test chamber makes the entire area more unsettling with its messily scrawled mantras and drawings. Finally, one of these drawings actually offers the player a hint, showing a cube dropping through a portal onto a turret.
The hall ahead with two turrets facing one another is the perfect place to try this, as each turret has a red “X” mark above it like the one prior. Even if the player can’t see it directly, the disappearance of the laser sight along with the cacophony of the turrets’ panic fire indicates their defeat, and their aim is wild enough that it’s unlikely to kill the player if they’re caught in it.

Chamber 16’s last few rooms are also the most threatening, with several turrets strategically positioned to cover most of their own room and even parts of others. Making their way around or otherwise incapacitating them allows the player to activate a button and open a door onward. This is the first point where the game’s symbols betray them, as the door is labelled just like an exit but opens to another turret past a grate.

This subversion continues to build the unsettling atmosphere the chamber brings to the narrative while making the single event memorable, so the player is more likely to remember the solution associated: placing a portal past the grate to get behind the turret. In case they didn’t get the point the first time, the final step to the elevator is another portal past another grate behind another turret; repetition is key for budding competency.
If the escalating complexity wasn’t clear enough already, we’ve come this far and only talked about a single Test Chamber. Fortunately, Test Chamber 17 is somewhat less redefinition-heavy, and the most important part of the test is the very end. That’s not to say, however, that the chamber is empty of noteworthy elements. In fact, it is this very chamber which introduces one of Portal’s most widely-known objects: the Aperture Science Weighted Companion Cube.
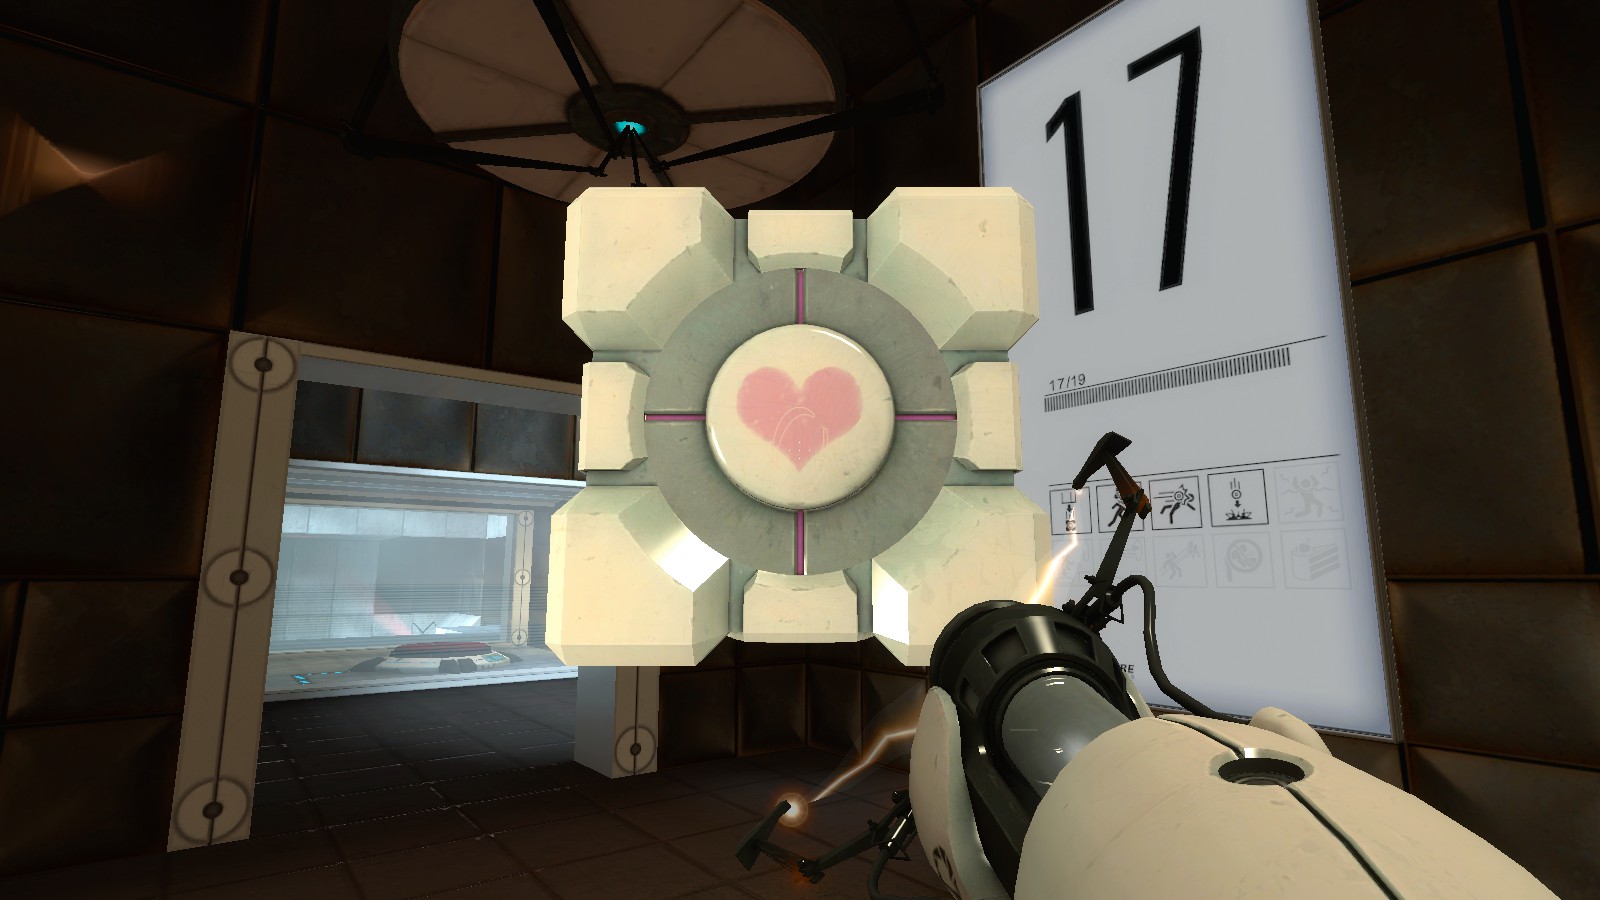
Functionally, this cube is identical in every way to its blue brethren. However, its unique, friendly appearance—coupled with the way the narrative talks it up—has the psychological effect of encouraging the player to keep it close. It even naturally lends itself to making the player care about the cube, as it is one of the only friendly things they’ve seen in their time at the facility juxtaposed against the several rooms of trigger-happy turrets they’ve just come through.
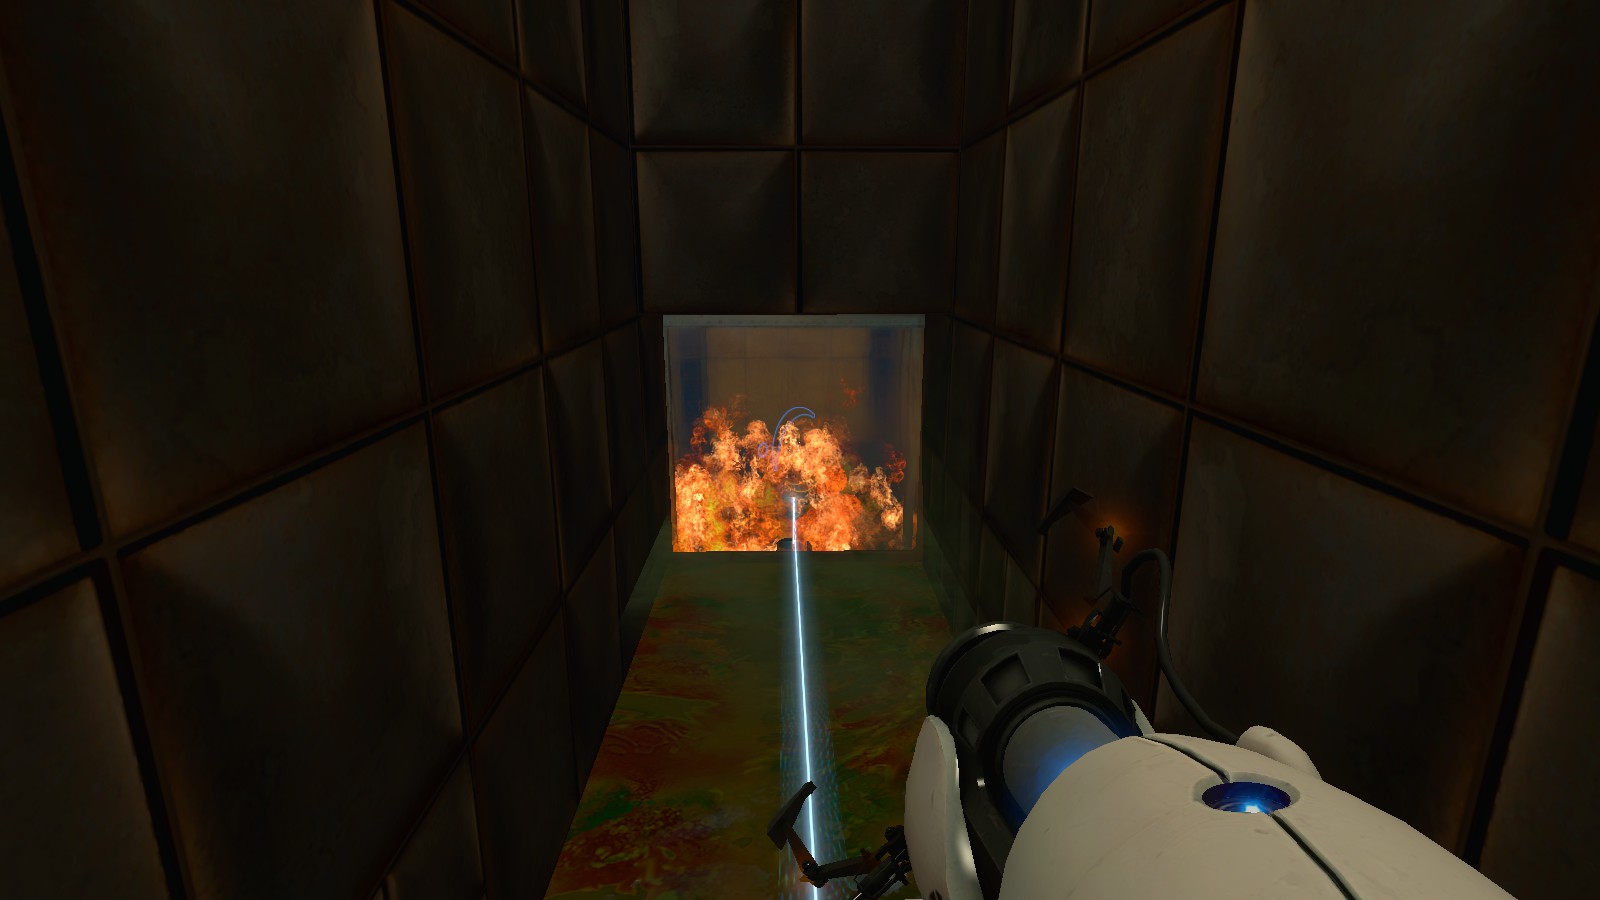
This encouraged attachment is, of course, deliberate. The chamber’s puzzles revolve around new ways of utilizing a single cube which must be carried throughout, as opposed to the cubes seen prior—many of which serve a single purpose, and will be instantly replaced should anything happen to them. The player must use their new companion as a step, a shield, and a weight in order to proceed, with familiar mechanics suddenly presented in a new context. The physical space of the chamber centers on a single button of unknown purpose, which the player is finally able to reach after uniting three energy pellets with their respective receptacles. The button, as it turns out, opens the way into a separate room with yet another button—this one linked with a timer to a nearby incinerator.

The chamber encourages attachment to the Companion Cube from start to finish, forces the player to rely on it to progress, then tells them to cast it into the fire with equal force. It all adds up to leave a significant impression, despite the incinerator never appearing prior; this is the kind of circumstance in which a mechanic is made abundantly clear in just one instance.
Excluding the ending, Test Chamber 17 is relatively light on new or complex information. This is far from the case for Test Chamber 18, however. The puzzles it contains make use of nearly every single element the player has encountered thus far, and they need to think on their feet to make it through. Yet the guidance which has permeated every other challenge remains here: portalable tiles lead the player’s gaze up to the ceiling and across to the next platform, just waiting for them to drop through to it. This setup repeats for the next few platforms, with one substantial twist the second time around. The only accessible location for a portal is in the wall above a pit of acid, which requires them to nearly jump into it to proceed.

After this revolt against common sense, the rest of the room is relatively straightforward, ending with a momentum jump across to a button without a cube. Pressing the nearby pedestal button leads the player into the most dangerous room they’ve yet encountered.

The pedestal button activates a panel, which moves both to allow entry and to act as a launching point within the room itself, then returns to its original position after a few seconds. This serves to lock the player in the room with several turrets—strategically placed to cover most of the area—along with an energy pellet emitter, a moving platform, and an expansive pit of acid. Despite the danger, the game continues to offer some aid to observant players. The energy pellet emitter rotates in ninety degree increments, and it has done so for long enough that its impact points are visible craters in the walls. These points combine with the turrets’ laser sights to suggest a possible solution, and should they test it, the player will find that energy pellets will knock out turrets just as readily as harm the player themselves.
Taking care of the turrets gives the player a little more room to breathe, which offers them more of a chance to reunite the pellet with its receptacle. This in turn starts the platform moving, leading to the two alcoves across the room. The upper alcove has a cube clearly visible inside, but is inaccessible from the platform. The lower alcove, however, contains only a pedestal button connected to the entry panel and a portalable wall to get back over before the timer runs out. Now the launching point can come into play; the portalable floor just above the acid pit offers plenty of speed to fling across and retrieve the cube.

Only a few more steps are required to remove the cube from the room and set it on the button where it rightfully belongs, and the player can then proceed through the door and into the final room of the chamber. The only places available from the entryway are an unprecedentedly deep pit and a separate platform amidst an acid lake. With such limited options—and presented with an unusually long drop—they may quickly connect the dots and try flinging themselves up from the platform, which leads to another, higher platform. One step at a time, they can continue to fall from portal to portal until they reach the chamber’s exit.
This leads us to Test Chamber 19, which happens to be the final test chamber Portal has to offer. While it looks somewhat imposing at first glance, the chamber is quite straightforward, and doesn’t compare to its predecessor in terms of challenge. The first puzzle element is an energy pellet emitter/receptacle duo set up to mirror a similar set piece back in Chamber 15: the two are directly adjacent, each facing an angled panel which will bounce the pellet toward the wall. Unlike its predecessor, the walls are non-portalable, so the player must place portals on each of the panels, then move one so the pellet doesn’t fly back through.

Activating the receptacle causes the platform to start moving, directly guiding the player through the rest of the chamber. Most of the challenge at this point has to do with thinking quickly; numerous obstacles lie in the player’s path, and the platform will not wait for them to find a way around. There are multiple solutions to the gate, pellet, and partial wall along the way, but all of them require the player to reason through when they should and shouldn’t remain on the platform. A cake sign seems to signal the end, but all is not as it seems.
The platform enters into a dark hallway, and both the narration and the music take a harsher turn. The path clearly leads into a pit of fire—the bright contrast with the dark surroundings makes it impossible to miss.
The platform’s movement slows significantly to give the player time to think, but they still need to act to avoid a fiery demise. Fortunately, Chamber 18 prepared them for this: the walls of the flaming room are portalable, as is a ledge on the far side. Jumping down into the flame is the only chance they have to escape—and the ledge is where we’ll leave things this time. There’s still a little bit further to go, as nothing feels even remotely resolved yet. Take a look at the chart before you go. We’ll be back to finish the escape soon.