
This post begins a series on the level design and mechanics of Cave Story. From start to finish, we’ll be looking at the way the game guides and teaches the player, the interaction of its various systems, and their impact on the player. With that out of the way, let us start from the beginning—a very good place to start.
The First Cave is a fantastic isolated example of instructive level design. It isn’t infrequent that the first areas in games are cited as such—the famous stairway antepiece example from Super Mario Bros. 1-1 comes to mind—but this cave provides opportunities to come to grips with the majority of the base mechanics and indicators.
This actually starts as soon as the player takes control. They start suspended above a small pool of water, forcing them to figure out the jump button before they can leave the cave. If they miss the jump off the platform, they’re introduced to water and how it affects jump physics—and the ability to breathe.

Should they choose to check them, they find that the glowing heart screen and spinning floppy disk restore health and save the game—functions which can be quickly assumed from the heart symbol and being a floppy disk any time since about 1995.
On leaving the room, the player is greeted by a similar floppy disk symbol above the door, setting a precedent by marking it as a save room. Should the player attempt to go right, the way is blocked by, well, blocks and the world’s most intimidating bouncy ball. This quickly establishes that there is something right, but they can’t get there yet, so they have to go left instead.
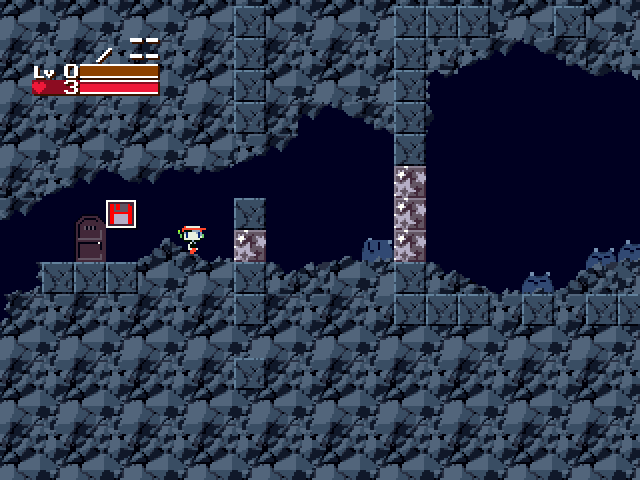
The floor to the left is bumpy and, in a somewhat unusual move, there are intimidating-looking spikes dotted around the ceiling and floor of the first area in the game. These spikes are placed in such a way that the player will learn a painful lesson in game physics should they attempt to charge full speed down the hall: There is momentum, and it will kill you.

Once the player makes it past the spikes, the first health upgrade is in full view—which tells them that there are health upgrades and what they look like, and gives them the health to survive a spike to the face. Barely 5 minutes in and we’re already getting stronger! Growth is encouraging, and small, tangible rewards early on help keep the player engaged where they otherwise might not be.

From there, they continue on down the passage and come to one of the first platforming puzzles: a small pool of water. Fortunately, if they fell earlier, they’re already prepared to deal with it, and whether they are or not, the only source of danger is another angry bouncy ball. A couple successful water jumps later and they’re rewarded with the first weapon: the Polar Star.

Having a gun completely changes the way the player sees the cave. Instead of an obstacle course, some parts of which are moving, they can shoot the enemies in their way. If they took the descent slowly, they observed movement patterns and have the tools necessary to predict movement, enabling them to dodge and fight back. The way up is backtracking, but it’s made different simply by having a weapon to deal with enemies.
Once they get through the blocks that were in their way before, there are several more enemies. The last of these is an enemy unique to this single encounter: the exit door itself.

It may seem strange that one of the first doors in the game is an enemy—and the only enemy door—but this absolutely guarantees that if they leave this cave, they have defeated at least one enemy. While it is technically possible to stand on the door platform to shoot it, chances are good this also ensures that the player knows they can shoot in midair.
The evil door leads through further cutscenes and into Mimiga Village. At the end of the first conversation between King and Toronto, King falls to the left. This easily directs the player to the next stop on the plot train, the Reservoir, without requiring a giant neon arrow sign or anything of the sort.

The next conversation between King and Toroko has the same type of guidance as the first. Toroko runs off to the right, and clearly drops from the platform to do so, leading the player to the Shack in the lower right corner of the village. Additionally, no matter how the player proceeds to the right side, the location of the Map System is at least slightly indicated.
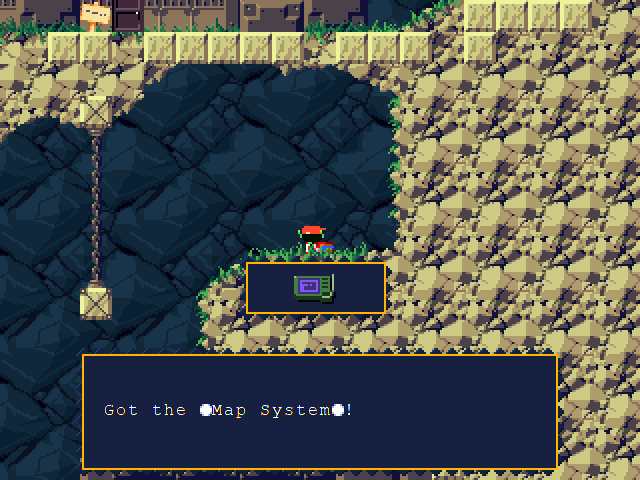
From below, the first platform is visible; from above, the chest itself. On picking it up, there’s a note about exploration, and with a higher pathway visible on the map, the player can travel off the beaten path to obtain the second Life Capsule. The game encourages and rewards exploration—they’re not going to trip over every last upgrade on their way to the end.
Down in the Shack, we have our first boss fight—but only if we want to. Balrog will just up and leave if the player says they don’t want to fight him. While rather amusing, this also lets the player hold off on a boss battle before they feel ready. Should they choose to fight, however, they’re presented with a clear, looping attack pattern: run, run, jump.

On the third pass, Balrog’s jump directly counters the player’s primary means of avoiding him, breaking expectations and adding just a touch of complexity to an otherwise rather simple affair. Of course, there’s also the option to just stand on this ledge and watch him hop around like a buffoon for a little bit, which is a safe enough vantage point to take a break and get his pattern down, if need be.
The last note I want to cover is the Cemetery. There is a clearly inaccessible door off in the upper right corner. Some may not notice it, but there isn’t any point to randomly throwing a door about willy-nilly. There’s something of note there, they just can’t get to it yet—and that makes it a detail to remember for the future.

That concludes the first leg of our journey. A bit of a lengthy one to start off, but there was a lot to cover in the first couple of areas. Join me back here again in a few weeks to continue this thoroughly analytical adventure.